High-Level API
Speos has a high-level API that lets you run jobs, do postprocessing and even hyperparameter search with only a config file and a call to the respective pipeline. For convenience, we have packaged the pipelines in command-line scripts so that you don’t have to get your fingers dirty at all.
In general, the process goes as follows: You write a config file which contains the settings for your experiment, put it into the desired pipeline in the form of a command line script, Speos runs the required training and analyses und delivers your results:
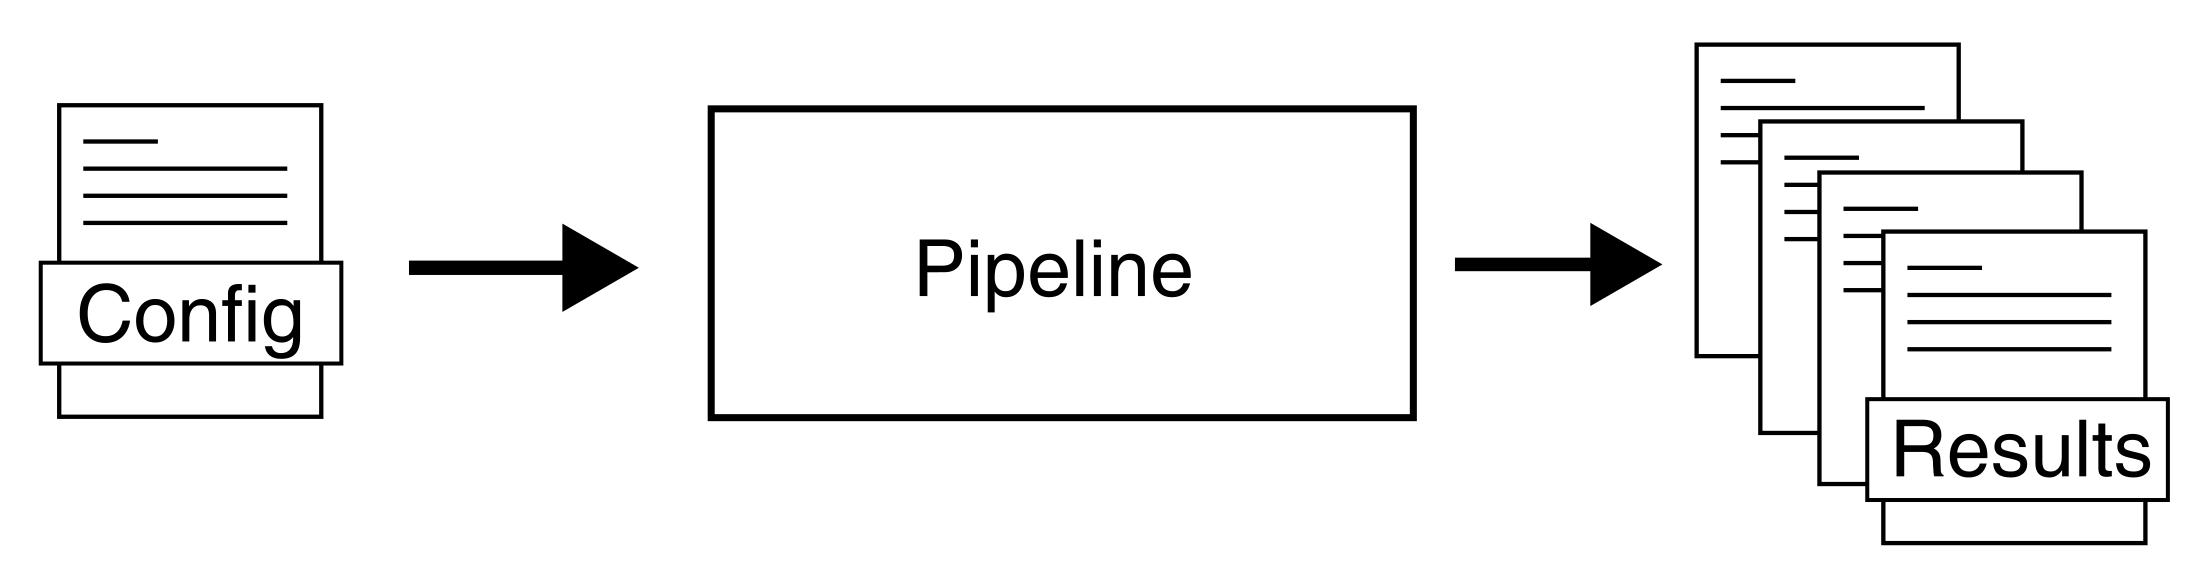
As you can see, this only depends on the config and the pipeline that you use.
Let’s first come up with an example config file. On the next page you will learn how to tweak the config file, but for now a simple one will do.
Lets write a config file like the following:
1  name: myrun
2
3  input:
4    adjacency: BioPlex30293T
5    tag: Cardiovascular Disease
6
7  model:
8    mp:
9      type: gcn
and save this rudimentary config as my_config.yaml.
Training
If we just want to trigger a single training run, say, to check if our config does what we want, we can pass it to the high-level training script.
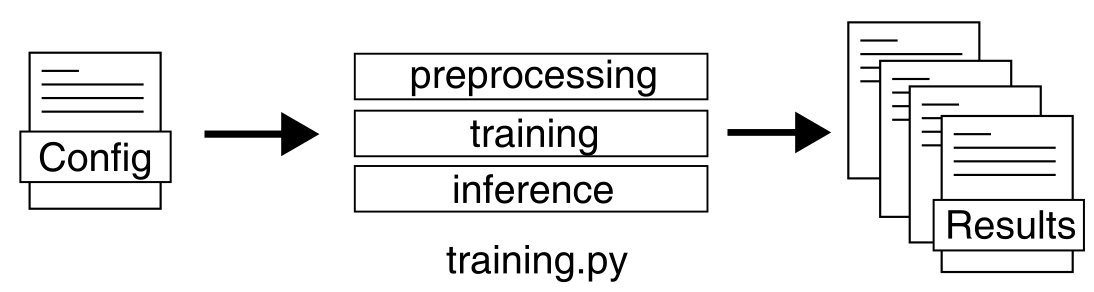
$ python training.py -c my_config.yaml
This will trigger a training run using the Mendelian genes for Cardiovascular Disease as ground truth labels, BioPlex 3.0 293T as adjacency and a vanilla GCN as graph convolution. The rest of the settings will be default.
First, the data will be preprocessed, then the graph neural network will be trained. After the model has been trained and early stopped on the holdout set, an inference will be triggered and predictions for all genes will be produced. The settings for the inference, like cutoff value or save path, are defined in the default config.
Inference Only
Let’s say you just ran the training command above but you can’t find the directory where the results are saved, or the results have been deleted. We can modify the config from above to explicitely tell Speos to save inference results to a specific directory by adding the following lines:
1  inference:
2      save_dir: ~/results/
3      save_sorted: True
4      save_tsv: True
and re-run only the inference:
$python python inference.py -c my_config.yaml
which will save all the results of the inference to /results/ without training the model again.
The inference basically skips the training step and instead loads the pre-trained model:

This assumes that the model has not been moved/deleted since it has been trained and that the config settings for the model save path are the same like when it was trained.
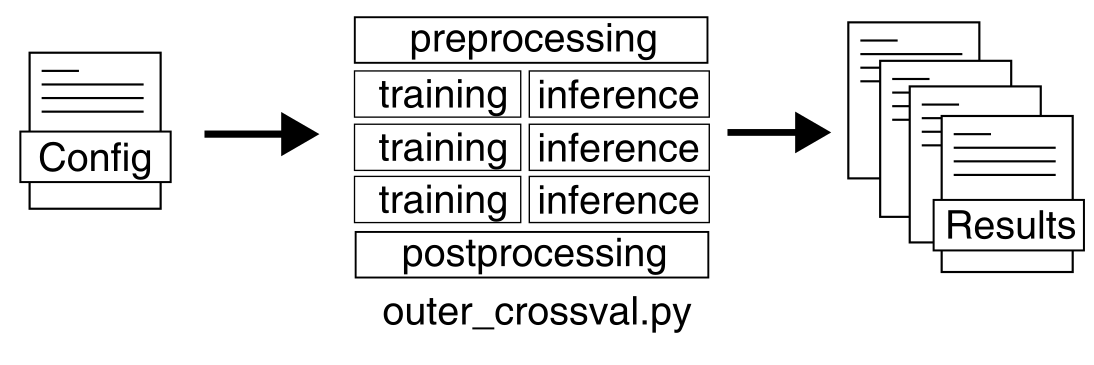
The Nested Crossvalidation
Although training a single model is nice and helpful, especially for testing purposes, Speos stands out by its nested crossvalidation scheme. It allows you to train an ensemble of methods and use the overlap in their predictions to prioritize disease genes. Afterwards, it uses these prioritized gene sets and the ground truth and does postprocessing analyses such as differentially expressed genes or drug target enrichment.
Note
You don’t have to run the nested crossvalidation ensemble right now, it is just here to showcase the different ways to use the high-level API scripts. In the next pages you will see how you can adapt Speos to your needs, run benchmarks, and then get a more in-depth introduction to the crossvalidation once you have your settings dialed in.
Let’s first draft a suitable config file:
 1  name: mycrossval
 2
 3  input:
 4    adjacency: BioPlex30293T
 5    tag: Cardiovascular Disease
 6
 7  model:
 8    mp:
 9      type: gcn
10
11  crossval:
12    mode: kfold
13    n_folds: 10
14    positive_only: True
15
16  inference:
17    save_dir: ~/results/
18    save_sorted: True
19    save_tsv: True
and save it as my_crossval_config.yaml.
Then we only have to start the crossvalidation run:
$python outer_crossval.py -c my_crossval_config.yaml
and wait for the results to roll in. Keep in mind that this trains n * (n + 1) = 110 models, so it might take a while on a cpu-only machine. Luckily, Speos auto-detects available cuda devices by default and moves the training and inference over to the gpu automatically.
Post-Processing
As the ensemble training can take quite a while, you don’t need to retrain it every time you want to change or adapt for postprocessing.
You can just change some of the keys in your config and pass it to the postprocessing.py pipeline which will load the trained models and only do the postprocessing.

$python postprocessing.py -c my_crossval_config.yaml
Have a little fun with it, but don’t forget that hyperparameter hacking and repeated hypothesis testing with different settings like this weakens your evidence!